Integrating a Third-Party Search Service Into Magento

I’ve just finished integrating a custom search module into Magento and thought I’d share how I decided to lay out the main components. Again, I’m still feeling out how all of the different pieces of the Magento puzzle fit together, so I’m sure there are better ways of doing this. However, refer to the diagram below, and I will detail my implementation.
Magento search module integration
Module integration

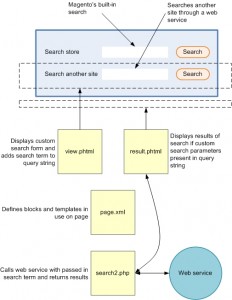
I have a search container that actually holds two different search types. The first search type is the built-in Magento store search. I did not change any functionality for this module, so I simply modified the stylesheets to have it fit into my theme. The second search type, however, allows the user to search a third-party service, and display the results inline with the current store. You don’t have to think of a specific web service, just a generic one which receives a search term and returns results.

As with all Magento modules, the new module must be registered with the framework (see earlier post). After that is done, the module must be displayed. I wrote a view.phtml page to display the custom search form. There is nothing too interesting about this file, just note that it contains its own form with its own action attribute. However, in this example, this behavior is identical to the built-in search form, which is to post back to the current page. In this case, it will add the search term to the page’s query string.

To display the results, note that the result.phtml file is always rendering HTML. There’s just nothing to render unless there is a search term present in the page’s query string (provided by clicking the custom search button). If a search term is present, result.phtml sends its parent object (search2.php, as defined in page.xml) the search term. Search2.php then calls the web service, receives the results then sends them back to result.phtml for rendering to the page.
Magento Architecture for a Simple Module

Preparing to write my first custom Magento module, I dove into the documentation that was available, as well as various blog posts, and slowly started to understand some of the pieces. The whole picture was eluding me, however, so I began to diagram how everything fit together. I referred to the following pages when creating the diagrams:

http://activecodeline.com/writing-a-custom-module-in-magento-detailed-walktrough/

http://www.exploremagento.com/magento/simple-custom-module.php

http://stackoverflow.com/questions/576908/how-does-magento-code-work

Please note two cautionary items before reading further. 1) I am new to the Magento framework, so the following explanations are based on my limited knowledge of this subject. 2) These diagrams detail an extremely simple custom module that does not take advantage of many advanced features, including layouts and controllers. I am hoping though that they may shed some light for some of you. I am currently working through some of those advanced features, however, and hope to post an article when I am comfortable with them as well.

I will dissect the module here, but you may view the whole thing at once at the bottom of this post.

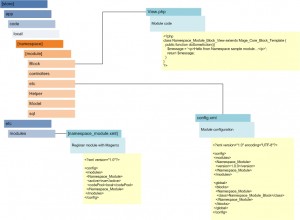
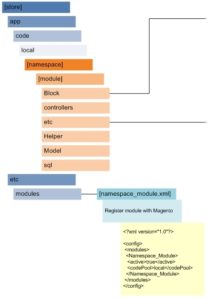
For the new module to be registered and seen by Magento, an XML file needs to be created in the following path: [store]/app/etc/modules/, where [store] is your store’s root directory. The XML file needs to be named with the following convention: [namespace_module].xml, where namespace is your code’s namespace (defined by you, usually your company name) and module is your module’s name.

Magento Module Registration
Magento module registration

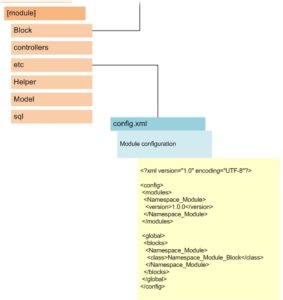
Your actual module resides in the following path: [store]/app/code/local/[namespace]/[module] and its several subfolders. You will create a configuration file in the etc folder called config.xml.

Configure the Magento Module
Configure the Magento module

Now the module needs to do something when it is called by a template, so we will create a code file called View.php and place it in the module’s Block folder.

Configuring the View
Configuring the view

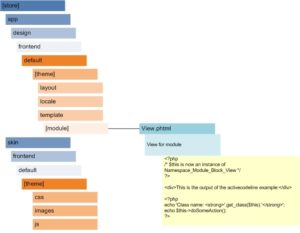
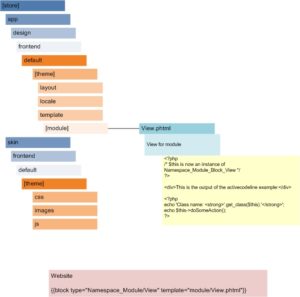
We will now move over to the theme, or skin, to see how to make use of this module on an actual store page. Your theme contains a template folder which holds folders for your modules. We will create a View.phtml file that outputs direct HTML and calls a function for more HTML in its model, or block, at View.php.

Output of the view
Output of the view

The only thing left is to actually instantiate the module on a store page. This will most likely be done as an integrated part of your theme, but for now we will keep it simple. Enter the CMS portion of your store and open up a page of your choice. Enter the following line somewhere in the body:

{{block type=”Namespace_Module/View” template=”module/View.phtml”}}

substituting namespace and module for your actual names.

What has happened here is that you’ve instantiated your module’s view (View.php) using the template (View.phtml). View.phtml now outputs HTML and calls its underlying model to provide more functionality.

I hope this makes sense for you and comes in as a handy supplement to the aforementioned links, as I am only beginning to grasp it. Feel free to comment and set me straight if I’m off in left field on any of this.

Here are the diagrams in full:

Magento module architecture
module architecture
Magento module skin architecture
Skin architecture