Falling Into the Complexity Trap

So many times I find myself, as a programmer, diving into a problem with an initial thought of a solution that ends up being way too complex. I don’t know if it’s programmers in general or just me, but it seems that as I gain more and more coding knowledge and can take on more and more challenging problems, my brain can fall into a complexity trap. What I mean by that is I now have numerous tools (algorithms, patterns, etc.) at my disposal, and at times I tend to attack a problem with one or more of these tools without stepping back, taking a deep breath, and determining which is the simplest way to get something done.

These solutions usually work, but the code can become messy and hard to maintain versus the simple way that I failed to see at the beginning.

I could probably make this a series of articles, as unfortunately, I tend to do this more than I’d like. But perhaps, writing this down, will force me to think about this issue more and prevent further frustrations.

OK, so now for a real world example. I’ve been recently working on an admin panel for a web app using PHP and Javascript with the Prototype.js library. There is a section of the admin panel where the user can create polls. The user enters a question along with one or more answers and can then re-sort the answers if desired. The re-sorting issue is where I started losing control.

Each answer is stored in an answers table in the database, and to keep it simple, we’ll just define three columns:

  • id
  • answer
  • sort_order

For the UI, the answers look something like this:

Poll Answers
Poll Answers

As you would expect, the up and down arrows allow you to move the answers up and down the list, effectively changing their sort order in the database.

So I immediately started down the road of reacting to the click of an arrow button by determining the current order of answers, swapping the sort orders in the database, getting the new order and manipulating the HTML markup to show the new order. Here’s the code (Note: this is just for moving an answer up the list. I had a separate, similar function for moving an answer down. I hadn’t refactored yet):

function upAnswer(id) {
	//get sort order for this row
	var sortOrder = $('orderAnswer_' + id).innerHTML;

	//if this is the first row, no need to move it up
	if (sortOrder == lowestOrder) {
		return;
	}
	
	//find the row immediately above the selected row
	var idAbove = 0;
	$$('.answerRow').each(function(i) {
		var checkId = i.readAttribute('id').substr(7);

		if ( checkId == id ) {
			throw $break;
		}
		else {
			idAbove = checkId;
		}
	});
	
	// swap the display orders in the database
	new Ajax.Request('/AdminPoll/SwapAnswers/' + id + '/' + idAbove, {
		onSuccess: function(response) {
			
			//store the answer this is going to be moved
			var moveAnswer = $('answer_' + id);
			
			//store both display orders
			var origOrder = $('orderAnswer_' + id).innerHTML;
			var targetOrder = $('orderAnswer_' + idAbove).innerHTML;
			
			//insert the moved answer in the right place
			$('answer_' + idAbove).insert({before:
				'
' + moveAnswer.innerHTML + '
' }); //remove the moved answer moveAnswer.remove(); //swap the display orders on the page $('orderAnswer_' + id).update(targetOrder); $('orderAnswer_' + idAbove).update(origOrder); //hook up the action buttons assignActions(id); }, onFailure: function(response) { alert('Unable to move answer'); } }); }

The code above can be summarized in the following steps:

  1. Determine the sort order for the row just clicked
  2. Since we are in the “move up” function, exit the function if this row is already at the top
  3. Loop through the rows to find the row immediately above this one
  4. We now know the two rows involved in the reordering, so call the database to swap the two sort_order values
  5. Copy the current row and move it to the position above the row just swapped with
  6. Delete the original answer
  7. Since we only moved the markup, call the assignActions function which wires up all of the events to the new input control and buttons

Yikes. Knowing that this was getting ugly, fast, I stepped back and looked at it again. Two key concepts drove the next iteration:

  1. There is no need to maintain the actual sort orders. Just make sure the answers stay in order. For example, if the current order is
    • [answer1 => 5, answer2 => 8, answer3 => 9]

    and we are going to swap the first two answers, the new order does not have to be

    • [answer2 => 5, answer1 => 8, answer3 => 9]

    It can be

    • [answer2 => 1, answer1 => 2, answer3 => 3]
  2. Change thinking from altering the database first then the markup. Instead, swap the two rows in markup, determine what happened, then send the new order to the database.

Here’s the new code:

function moveAnswer(id, moveUp) {
	//get the answer element that is going to be moved
	var answerSource = $('answer_' + id);
	
	//get the current order of the list
	var answerOrder = new Array();
	var iCounter = 0;
	$$('.answerRow').each(function(i) {
		answerOrder[iCounter++] = i.readAttribute('id').substr(i.readAttribute('id').indexOf('_') + 1);
	});
	
	if (moveUp) {
		//make sure that the answer the user wants moved isn't already at the top of the list
		if (id == answerOrder[0]) {
			return;
		}
		else {
			//get the element above the source element
			var answerTarget = $('answer_' + id).previous();
			answerTarget.insert({
				before: answerSource
			});
		}
	}
	//move down
	else {
		if (id == answerOrder[answerOrder.length - 1]) {
			return;
		}
		else {
			//get the element below the source element
			var answerTarget = $('answer_' + id).next();
			
			answerTarget.insert({
				after: answerSource
			});
		}
	}
	
	resortAnswers();
}

function resortAnswers() {
	//get the order of the answer ids
	var answerOrder = new Array();
	
	$$('.answerRow').each(function(i) {
		if (i.readAttribute('id') != null) {
			answerOrder.push(i.readAttribute('id').substr(i.readAttribute('id').indexOf('_') + 1));
		}
	});
	
	if (answerOrder.length > 1) {
		new Ajax.Request('/AdminPoll/SortAnswers/' + answerOrder.join(), {
			onSuccess: function(response) {
			},
			onFailure: function(response) {
				alert('Unable to sort answers');
			}
		});
	}
}

First, note that this function handles moves both up and down by passing in a boolean. Here is a summary of the new code:

  1. Get the answer that’s going to be moved
  2. Get the current order of answers
  3. If the answer is not at the end of the list already, insert it before or after the answer next to it, depending on which way we are moving
  4. Call the database to store the new order

Ahhh, this feels so much better. As you may have noticed, the new code really isn’t any smaller (although there’s still improvement to be made), but it is much cleaner and handles the resorting more efficiently.

A couple of key indicators that I’m about to fall into the complexity trap and should stop me in my tracks are:

  • The code is getting ugly
  • The nagging feeling that there’s probably a function out there to handle something I’m trying to work out (in this case, Prototype’s next() and previous() functions)

It felt good to get back in there and clean up that code. But if I can be more aware of the warning signs, maybe I can do it right in the first place.

Finding the Bottom of the Page

I ran into a challenge the other day where I had to calculate how much space was left between an HTML element and the bottom of the browser window. We were using Google’s Search-As-You-Type code (http://code.google.com/p/search-as-you-type/) which, according to a fellow developer, “worked like a dream”. He then handed it off to me to implement in another section of the application.

He had been using the search bar at the top of the page with no problems, whereas I needed it further down in a form. I dropped in the code and found that the JavaScript was somehow not calculating a dimension correctly. Depending on where you had scrolled the page to, the search box would either shrink the height of the dropdown results to barely anything, or sometimes nothing at all!

The Google code has a function called updateDimensionsAndShadow(), and that seemed to be the culprit. So after trying to modify what was in there and getting nowhere, I added a small section of code for the script to calculate the dropdown height correctly. Now, the big challenge for me here was that I’ve never had to try and find where the current “bottom of the page” was. I usually worry about the positioning of an element from the top of the page. So here is what I learned, and the code I wrote to fix the height issue.

Finding the Bottom
Finding the Bottom

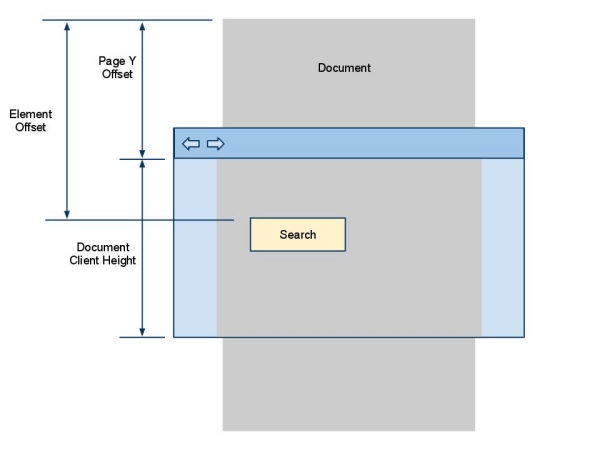
The first thing we do is find the y-coordinate for the top of our input element of our search box, relative to the top of the document. This is done by first grabbing the offsetTop of the element which is it’s position relative to the container it’s in. We add the offsetHeight of the input because we are going to actually want the position of the bottom of the input box (that’s where the dropdown list will start).

var sf = document.getElementById('searchField');
var searchTop = sf.offsetTop + sf.offsetHeight;

Next we will cycle through all of the element’s ancestor’s (via offsetParent) and continuously add each of their offsetTop coordinates to our caclulation. This will give us the y-coordinate of the bottom of the search box relative to the very top of the document.

var sfParent = sf.offsetParent;
while (sfParent) {
 searchTop += sfParent.offsetTop;
 sfParent = sfParent.offsetParent;
};

Next we will get the position of the bottom of the browser’s toolbar, relative to the top of the document.

var yOffset = (window.pageYOffset) ? window.pageYOffset : document.body.scrollTop;

We can now finally calculate the max height of our search results dropdown list (refer to the diagram).

var maxSearchResultsHeight =
document.documentElement.clientHeight - (searchTop - window.pageYOffset) - searchAsYouTypeConfiguration.bottomPageMargin;

What we are saying here is “The height we have available is [the visible height in the browser] minus [the difference between the top of the element in the document and the bottom of the browser toolbar in the document] minus [the margin we want between the droplist and bottom of the browser]”.

Now the one thing I do need to fix yet is cross-browser compatibility (cough, IE, cough, cough), but the above modifications appear to be working in the real browsers.

Please let me know if you have a better way of finding the bottom of the page.

How To Write a Simple Facebook Share App

facebook developer
Developing Apps for Facebook

Can I Just Cut Some Code Already?

All I wanted to do was to let users share a video link from a web app I was building. I thought it would be easy. And you know what, it probably is. It’s probably easier than what I’m going to show you here. But is it simply stated somewhere in Facebook’s documentation? Not that I could find. So piecing together parts of their docs, plowing through search after search and reading a multitude of blog posts, I came up with this solution.

Quick Overview

The idea is a simple one. The web app let’s you choose a video and view it within the site. If the “share this” button is clicked, the familiar Facebook dialog will popup, letting the user add an additional message to the built-in metadata for the share. If the user has not yet logged into Facebook, they will be prompted to do so. OK, here we go.

Set Up a Facebook App

I thought that you could simply call a Facebook url with some extra information and you were all set, but all of the examples I saw included an application id as part of the call. So I needed to setup an app. For those of you that haven’t done this before, here is a quick summary.

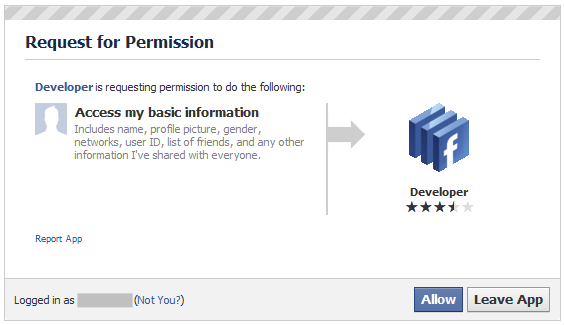
Search for the Developer App in the search bar and install it to your Facebook account.

Add the Developer App

After you install, you will be presented with a page that allows you to configure the app. There are a lot of settings here, and many of them pertain to applications with a lot more complexity. For our purposes, we are really interested in only a few things. Fill out the basic info as desired (such as website, support email, etc.) and add a logo to spruce up the share dialog box. You will notice on the main settings page that an application id is presented for you. You need that for your share code.

One other note is that apps can have sandbox mode enabled. When in sandbox mode, only you, as the developer, can use the app. This is of course useful for testing. Don’t forget to disable the sandbox when you are ready to go live.

Sandbox Mode
Sandbox Mode

Writing the Code

OK, now let’s get down to it. Like I mentioned, this is quick.

$('#shareFacebook').click(function(event) {
 window.open(FB_FEED_DIALOG_URL +
 'app_id=' + FB_APP_ID +
 '&redirect_uri=' + FB_LINK_DOMAIN +
 '&name=' + FB_TITLE_PREFIX + data.title +
 '&caption=' + data.title +
 '&description=' + data.description +
 '&source=' + FB_YOUTUBE_SOURCE_PREFIX + data.videoId +
 '&link=' + FB_YOUTUBE_LINK_PREFIX + data.videoId +
 '&picture=' + FB_YOUTUBE_PICTURE_PREFIX + data.videoId + FB_YOUTUBE_PICTURE_SUFFIX
 );
});

I have the call to Facebook wrapped inside a jQuery click event which opens a new window. The heart of it is the URL inside of window.open().

  • The call starts out with FB_FEED_DIALOG_URL which is set to ‘http://www.facebook.com/dialog/feed?’.
  • Set your application id which you obtained earlier.
  • Add the URL that you want Facebook to redirect the user to after they’ve shared the link. Note that Facebook will append a ‘/?postId=xxxx’ to the URL so be prepared to handle that. I simply ignored it by telling our routing rules to trim off the question mark and everything after before handing it to the dispatcher.
  • The name, caption, description, source, link and picture will show up in the share dialog box.

As you may have noticed, I’m sharing a YouTube video. That also brought it’s own challenges on how to set these parameters correctly. I believe I obtained these settings from a blog somewhere, which I can’t remember (thank you to the author):

  • FB_YOUTUBE_SOURCE_PREFIX = ‘http://www.youtube.com/v/’
  • FB_YOUTUBE_LINK_PREFIX = ‘http://www.youtube.com/watch?v=’
  • FB_YOUTUBE_PICTURE_PREFIX = ‘img.youtube.com/vi/’

The YouTube video id is appended to each of the above constants.

The dialog looks like this:

Facebook Share Dialog

After the user clicks the Publish button, the link is posted to their wall and they are redirected to the URL you specified.

Conclusion

I really hope this helps some of you out there as I could not figure out why something seemingly so simple was taking me forever to figure out. Also, I’m sure there are a lot of alternatives to this method — some much simpler I’m afraid. I’d be interested in hearing your solutions.

Cache Woes in Internet Explorer

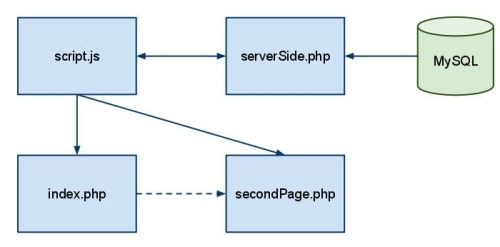
I just finished troubleshooting one of my websites that was acting abnormally in Internet Explorer, and I have emerged from the battle, heavily scarred. Here is a snapshot of the files involved (the actual names of the files have been changed to protect the innocent):

File Diagram for IE Cache Issue

It’s a simple setup. Index.php holds a form and is supported by a JavaScript file. The JavaScript file makes AJAX calls to serverSide.php, which in turn accesses a MySQL database. The JavaScript file then redirects the browser to secondPage.php and serves up the data.

The serverSide file is also accessed from secondPage through the JavaScript file. And therein lies the problem with Internet Explorer. Once index makes its call to serverSide, IE stores serverSide in its Temporary Internet Files folder. So when secondPage calls serverSide with new parameters, serverSide is retrieved from the cache folder instead of being called at the server and delivering fresh data to secondPage.

The solution was found in the php manual. There it gives the following information in the “header” article:

PHP scripts often generate dynamic content that must not be cached by the client browser or any proxy caches between the server and the client browser. Many proxies and clients can be forced to disable caching with:

<?php
header("Cache-Control: no-cache, must-revalidate"); // HTTP/1.1
header("Expires: Sat, 26 Jul 1997 05:00:00 GMT"); // Date in the past
?>

I added this code to secondPage and sure enough, IE ignored the cached version of serverSide and served up fresh data.

I hope this information will save someone else from a massive headache.

Adding jQuery to a Custom DotNetNuke Module

Step 1: Register jQuery

In the code behind for the page you will be making jQuery calls, register the library in the OnPreRender event:

protected override void OnPreRender(EventArgs e)
{
string moduleDir = this.TemplateSourceDirectory;
Page.ClientScript.RegisterClientScriptInclude("jQueryScripts", moduleDir + "/scripts/jquery-1.3.2.js");
Page.ClientScript.RegisterClientScriptInclude("jsUtilities", moduleDir + "/scripts/utilities.js");
}

The first line stores the path to the module’s folder. I stored the jQuery library in the module’s scripts folder, so the next line registers the library with a supplied key (your choice of name) and the path to the library.

The third line registers another javascript library, this time one of my own javascript files.

Step 2: Initialize jQuery

DNN has name conflict issues with jQuery so the following line is needed (thanks to Steve Johnson at Abstract Coder for this tidbit):

var $j = jQuery.noConflict();

I included this in my utilities.js file outside of any functions.

Step 3: Call jQuery Functions

It is important to note that all of your calls to jQuery functions will use this $j variable instead of the normal, single $ you will find documented just about everywhere.  So for example, the document ready function will look like this:

$j(document).ready(function() {
//your code here
});

Now you can write your normal javascript code and call jQuery functions throughout. Just remember to use the $j variable.

Step 4: Accessing Control IDs

This step is not specific to jQuery, but I wanted to include it because I found that many people, including myself, were having a hard time trying to figure out how to target controls with javascript. Consider the following ASP.NET control on a page:

<asp:textbox id="simpleTextBox" runat="server" />

When using this control server-side, say with C#.NET, you write things like:

string t = simpleTextBox.Text;

So, naturally, you’d think to access this control via javascript, you would write something like:

t = document.getElementById("simpleTextBox")

However, ASP.NET will prefix all of your controls with parent container IDs to avoid conflicts. Thus your ID of simpleTextBox will be converted to something like dnn_ctr459_EditMyModule_simpleTextbox. This doesn’t matter to your code as it stays server-side, but once it hits the client, your javascript code has no clue what simpleTextBox is anymore.

My solution is to specifically tell javascript what the new name of the control is (my thanks to steveradich’s post at aspdeveloper.net for nudging me in the right direction here).

1. Register the javascript event handler when the page loads

protected void Page_Load(object sender, EventArgs e)
{
simpleTextBox.Attributes.Add("onclick", "testFunction('" + simpleTextBox.ClientID + "')");
}

The key to this line of code is the ClientID property. We are sending our javascript code the new name of the control here.

2. Access the control from javascript

testFunction(cid) {
c = document.getElementById(cid);
}

Note here that we are using the same getElementById function, but now we are armed with the new ID of the control.

3. Target the control with jQuery

The following is an example of targeting the control using jQuery syntax:

$j('#' + cid).slideDown('normal');

*Note: I used this solution with my current installation of DNN, which
is 4.9. Version 5.0 has native jQuery support, which may change some of
these steps.

Lessons in JavaScript and AJAX

I’ve recently added AJAX capability to the flightphys site, which was my first foray into the world of AJAX. I also took advantage of the excellent Shadowbox library. I’ve walked away with a few lessons:

  1. Making simple AJAX calls is really simple once you’ve gone through a few tutorials. I initially tried to use a few different libraries and couldn’t quite get things to work the way I wanted to. So I buckled down and learned some raw AJAX. A good tutorial is at w3schools. After letting the material sink in, I was able to process a form by running some server-side PHP and returning HTML through an AJAX call.
  2. Shadowbox does not like to be auto-initialized when using AJAX. Usually, you set up Shadowbox in your page’s <head> section and wait for the page’s elements to make the calls. However, if you’re making AJAX calls, you may not want Shadowbox to run until you’ve loaded the correct elements. To accomplish this, modify the skipSetup property in shadowbox.js from false to true. Then, after your AJAX call, add calls to Shadowbox.setup() and Shadowbox.init().
  3. If you are calling AJAX from a form, chances are you do not want to actually submit the form. So you add an onClick() event to the form’s button (which, by the way, is now just a type=”button” and not a type=”submit”) and everything is fine right? Almost. If the user presses the Enter key, the form will still try and submit. To prevent this behavior, you’ll want to add an onkeydown() handler to your form. In the handler, check if the Enter key was pressed, and handle it there.

These were just quick overviews of the solutions. If you’d like more detail, please let me know.