So this post is really just a mess of thoughts and questions that have been erupting out of my cranium the last few months or so, as I’ve dealt with decisions on using different platforms and technologies for different projects. Unfortunately, I don’t think I’ve come up with any answers yet, but getting this out in print is relieving some of the built up pressure.
I’ve been involved in several website projects recently where the question keeps arising as to whether to use a framework, and if so, which one? The “which one” question can be complicated enough, but I’ve been taking a step back and really trying to decide if I want to use a framework at all!
Now, I’ve been involved in this battle for some time now, and it has intensified with my recent experiences with Drupal projects. I’ve built several sites now in Drupal with varying degrees of success. It’s been a roller coaster. It usually starts with the siren call that sounds like “Hey! You could do just about everything you want in Drupal. Why not plunge all the way in and make this your framework for life!” But in the valleys, I’ve wanted to throw everything away and just write pure PHP or make a living somehow in the deep wilderness. It’s making me second guess myself on choosing the correct tools for the job.
Take for instance one of my recent projects. It’s an ecommerce site of sorts, and as you would expect, the design calls for a listing of products, with filters on the left and sorting on the top — like Amazon.com and most other sites of that nature. It’s being built in Drupal. Easy enough, I say. The versatile Views module can handle that. But guess what? Far into the process I realize that you can’t separate the filter controls from the sort controls. There’s a contrib module out there that is addressing this, but it’s still in development and it’s not working on my site. So I start digging through the Views code, trying to figure out what’s gone wrong and in my mind I’m thinking, “If I was building this site in straight PHP or .NET I could write this in five minutes!”
And there’s the problem rearing its ugly head again. What makes more sense? Building a site from scratch, where you have a handle on all of the mechanics, or using a framework where a lot of the standard site code is already written and feature-rich? The lure of the framework, where a lot of things are already taken care of (user administration, roles and security, page editing, etc.) is very enticing. But what I’ve found is that there are always several features the client wants that the framework doesn’t readily handle. And some of them are shockers (like the filter/sort mentioned above).
Now, I’m a coder, so you say, “Randy, if you can code, then just get in that open source goodness and change the code to do what you want.” I can do that, but if you are working with a large framework (e.g. Drupal) it usually isn’t a matter of just hopping into a file and changing a couple lines of code. The framework is massive, it’s extended with a thousand modules written by a thousand different developers and a lot of it, by necessity and good practice is abstracted quite a bit to handle an unknown number of use cases. So it takes time, sometimes a lot of time, and I’m always facing a deadline.
So it sounds like I’m really trashing Drupal. That is not my intent. I’ve worked on several projects where it was the right tool for the job and for the most part, did most of what the client wanted. If it doesn’t, however, that custom coding can get out of hand. The Drupal API is monstrous and I’ve coded quite a few custom modules with it, as the need arises. Sometimes it’s straightforward, many times it’s not.
Lately, I’ve been leaning more towards using PHP supplemented with code libraries. That way I can write PHP without worrying how to integrate it into some massive code base. Using something like Cake or OpenAvanti gives you MVC and ORM out of the box and you can just start coding and feel the cool breeze on your face. Starting a project this way, you can still hear those sirens beckoning, “We’ve already got user admin and page editing ready to go over here.” But I have to resist. Once over there I get sucked in, and before I know it I wish I was back where I had my hands on the wheel.
I recently had to add a search filter to a Drupal site where the user can filter down criteria to find a reduced listing of products. This is called Faceted Search and is a common navigation technique on ecommerce sites. Think of the left side of Amazon’s site where you can pick Toys then filter down to a specific department and age group.
Exposed Filters
After searching the Drupal contrib library for something that would work, and wanting to stay away from any extra server-side configurations, I decided to write my own. This was an intense battle with the Drupal API and I am publishing the solution here to help others out and hopefully get some feedback on things I could have done better.
The Test Site
OK, so let’s lay some groundwork here for the test site. It is built on Drupal 7.15 and includes the following contrib modules worth making note of:
I’ll make note of when these modules are used and for what purpose throughout the article.
We will be mimicking a small portion of Amazon’s website by building a Drupal site where you can shop for toys. To start, I have created a couple of Taxonomy Vocabularies — Department and Age Range — and populated them with a few terms (e.g. Action Figures for Department and 2 to 4 Years for Age Range). I then created a Content Type called Toy which includes the following fields:
Title
Body
Department – term reference
Age Range – term reference
I have then created several toys from a couple of different departments and age ranges. We are now all set to create some views to show us the toys and work on the tools that will help us filter down the list.
Initial Setup of “Shop Toys By” Views
We are going to create a page that lists the different filter terms available for the user to shop by. For example, we’d like the user to see a heading called Shop By Department with the various departments listed underneath. We will do this by creating two views — one for shopping by department and the other for shopping by age range. Make sure you have the Views module installed with Views and Views UI enabled.
Create a view called “Shop Toys By” which is a listing of Taxonomy Terms from the Department vocabulary. We want this created as a block.
The Shop Toys By View
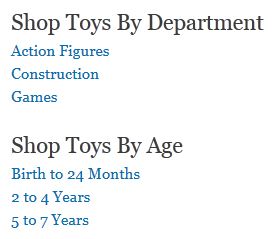
Click “Continue & Edit”. Change the Display Name to “Department” and the Title to “Shop By Department”. If you look in the preview area at the bottom of the page, you should see a listing of Departments.
Shop By Department Preview
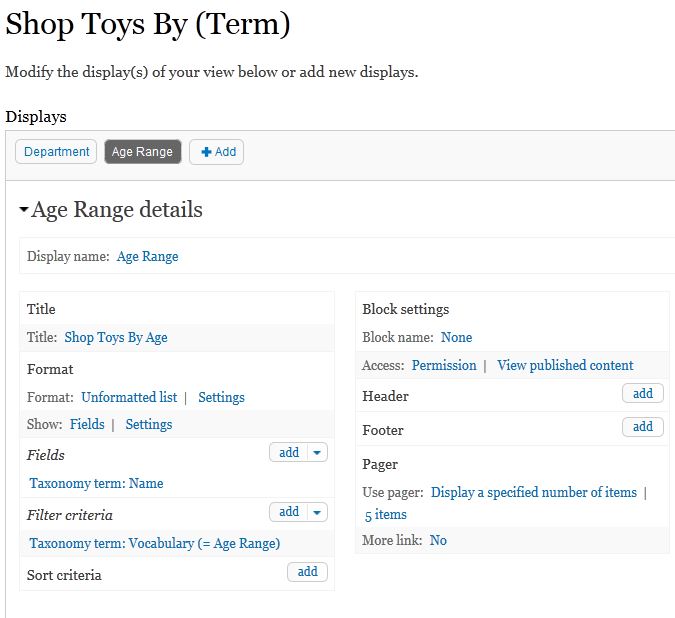
We also want to be able to shop toys by age range, so clone the Department block and change the new block’s Display Name to “Age Range” and the Title to “Shop By Age”.
Shop Toys By View Blocks
The Shop Toys Page
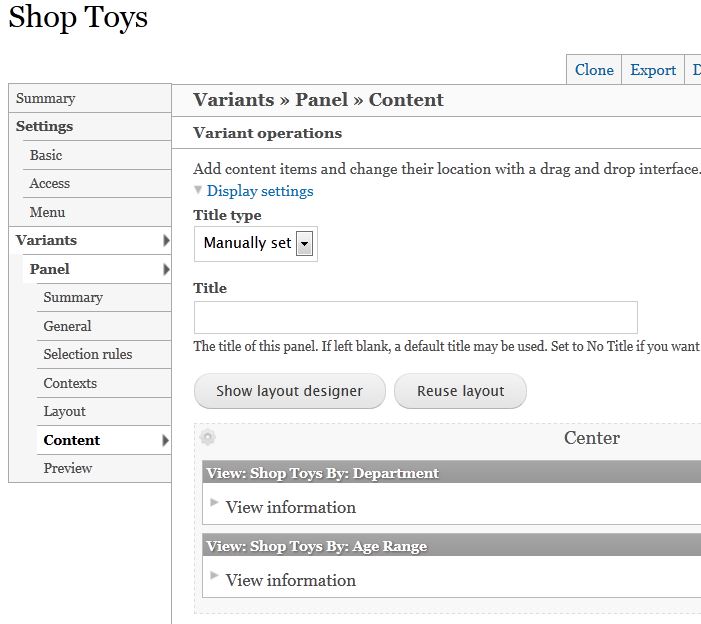
We would now like a page to display both of these views to give the user all of these options for starting to shop. There are a couple of ways to do this but I have decided to use Panels to create a page then drop the two views onto the page. Make sure the Panels module is installed as well as the CTools-Page Manager module so we can create a Panel Page. Also make sure that CTools-Views content panes module is enabled so we can drop views output into panels as you will see in a moment.
Navigate to Structure|Pages and click “Add custom page”. I created a page with the path “shop-toys”. In the Content section of the Panel Page, drop the two “Shop By” views.
Creating the Shop Toys Page
If you navigate to /shop-toys now you should see something like this:
Shop Toys Page
OK, that’s a start. We have the first step toward shopping for toys via filters.
The Search Results Page
Let’s now create the Search Results page, which will show a listing of all toys that match the incoming filters. Again, there’s a couple of ways of creating this page. This time, I created a view as a page with the path /toy-search-results. To keep the output simple for now, we will simply list all toys that have been published and show their teaser content.
If you preview this view now, you will of course see a listing of all the toys you have entered into the site. Being that this is a search results page though, we will want some way to tell the listing to limit its results based on certain criteria. We want the user to arrive at this page from somewhere else via a url formatted such as /toy-search-results/department/age-range (e.g. /toy-search-results/action-figures/2-to-4-years). To accomplish this, we need to add Contextual Filters to this view.
We add the first Contextual Filter for the Department Field. We set it up as follows:
When the filter value is NOT in the URL: Provide a default value, Raw value from URL, Path component – 1
When the filter value IS in the URL or a default is provided: Specify validation criteria, Validator – taxonomy term, Vocabularies – department, Filter value type – term name converted to term id, Transform dashes in URL to spaces in term name filter values, Action to take if filter value does not validate – display contents of “no results found”
What all of this means is the view is expecting the first argument in the URL to represent a toy department. The first argument is coming in as a taxonomy term (e.g. action-figures), it’s from the Department Taxonomy Vocabulary and we want it converted to the actual Term ID.
We then add the second Contextual Filter for the Age Range Field, using similar settings as above.
Looking at the preview for the view, you will see nothing until you enter some arguments into the Preview With Contextual Filters textbox. For example, I entered “action-figures/2-to-4-years” and received a result set.
So at this point we are able to enter a URL in the format of /toy-search-results/department/age-range and get a filtered listing of toys. So let’s make sure we can get there from our Shop Toys page.
Modifying the “Shop Toys By” Views
If you now navigate back to the Shop Toys page and hover over a link, say, Action Figures, you will see that the link points to something like “/taxonomy/term/15”. This is not the behavior we want of course. We’d rather have it go to “/toy-search-results/action-figures”. To do this, we need to modify how our “Shop Toys By” views are writing their links.
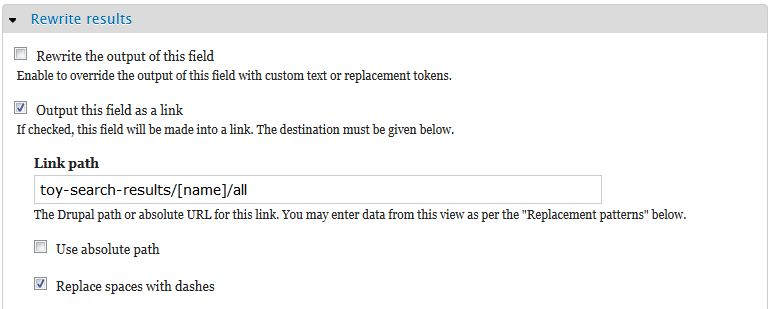
Within the view, under the Fields section, you will see “Taxonomy term: Name”. Click it to adjust its settings. Uncheck “Link this field to its taxonomy term page” which is causing it to point to the wrong location. Under the “Rewrite Results” section, check “Output this field as a link”. Now we can define where we want the link to point to. In the “Link path” textbox we can specify the target URL. Notice under the “Link path” textbox the message “You may enter data from this view as per the ‘Replacement patterns’ below.” We have one option which is “[name]”. That’s exactly what we want because we want to send the taxonomy term name to the results page. Note: the Token module must be installed to get replacement patterns.
Enter the following in the “Link path” textbox: toy-search-results/[name]/all. OK, why the “all” term at the end? The view will not like it if it is missing any of its contextual filters, so “all” will satisfy it. This is what we want at this point anyway. If we were to click on the “Action Figures” link, we are looking for all action figure toys regardless of age range. Also make sure the “Replace spaces with dashes” checkbox is checked since we know our search results view is expecting dashes in the URL.
Rewrite Results
Do the same thing for your Age Range block except your “Link path” should read “toy-search-results/all/[name]”. Save the view. Now if you navigate to the Shop Toys page, you will see that the terms are linked correctly. Click one of them and you will be taken to the Toy Search Results page with a filtered listing of toys.
Filtering by More Than One Value
OK, this is great so far, but what if you want to get a listing of action figures for 5 to 7 year olds? Let’s give the user a place on the search results page to add more filters. Navigate to your Toy Search Results view. What we want to do here is add filter criteria to allow the user to select a department AND an age range if they desire. Add a new filter criteria for “Content: Department”. Select “Dropdown” in the next window but we will override this in a minute. In the next window, check the box for “Expose this filter to visitors, to allow them to change it”. That is all we need here. In the preview area, you should see a droplist allowing the user to select a department.
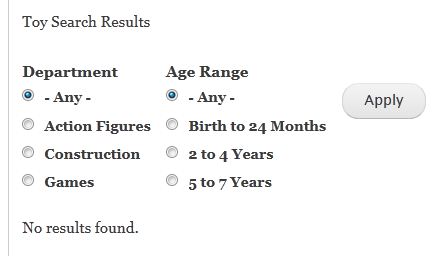
Being that this is an ecommerce-like filter, we would really rather have radio buttons for the selections instead of dropdown lists. For this, you need to install the Better Exposed Filters module. You may then go over to the “Exposed form style” in the Advanced section of the view and select “Better Exposed Filters”. Select “checkboxes/radio buttons” for the field controls. The view preview will now look something like this:
Exposed Filters Preview
Save the view and navigate to the Shop Toys page. Click a link and the Search Results page will show the results and include filters for further refinement. Unfortunately, at this point, both Department and Age Range radio button sets have -Any- selected, even though we already selected our first filter criteria. This does not make for a good user experience. Also, that Apply button is not doing what we want either, so we’ll have to do something about that.
Updating the Filters
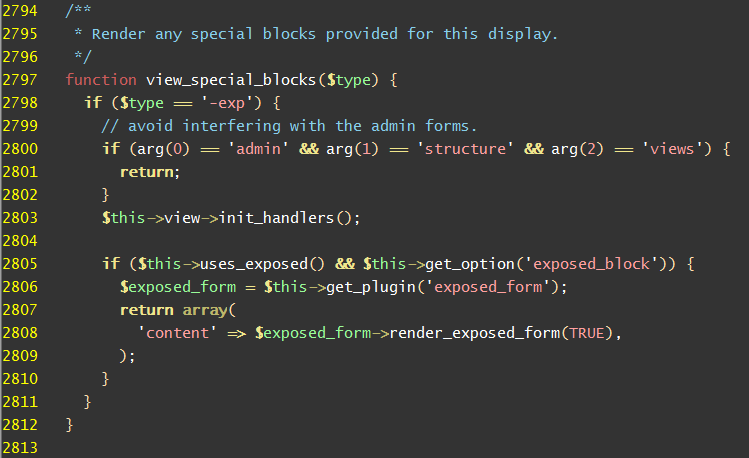
OK, so let’s tackle those radio buttons first. When we arrive at this page with filters in the URL, we would like the radio buttons to reflect that. In order to do this, we are going to need to write a custom module and modify the behavior of this view. Note that I am not going to go into the basics of creating a Drupal module here. You can refer to this tutorial if you need some basic instruction.
I created a custom module called “toysearch”. In the module file I implement the form_alter hook so I can modify the exposed filter form.
function toysearch_form_alter(&$form, &$form_state, $form_id) {

}
In this next code snippet you will see that I am simply parsing the incoming request URL, finding the available options in the $form parameter to match terms against, then altering the form via the $form_state parameter to select the correct radio buttons.
function toysearch_form_alter(&$form, &$form_state, $form_id) {
    //make sure this is the toy search filter form
    if (strpos($_SERVER['REQUEST_URI'], 'toy-search-results') != 1 ||
        $form_id != 'views_exposed_form') {
        return;
    }

        //get the page arguments
        $argStartPos = strpos($_SERVER['REQUEST_URI'], 'toy-search-results') + 19;
        $argString = substr($_SERVER['REQUEST_URI'], $argStartPos);
        $args = explode('/', $argString);

        //select the appropriate filter value for each argument
        $argCounter = 0;
        foreach ($args as $a) {
            //replace the hyphens with spaces so we can match the arg
            $a = str_replace('-', ' ', $a);

            switch ($argCounter++) {
                //department
                case 0:
                    $matchFound = false;
                    foreach ($form['field_department_tid']['#options'] as $optionId => $optionValue) {
                        if ($optionValue == $a) {
                            $form_state['input']['field_department_tid'] = $optionId;

                            $matchFound = true;
                            break;
                        }
                    }

                    if (!$matchFound) {
                        $form_state['input']['field_department_tid'] = 'All';
                    }

                    break;
                //age range
                case 1:
                    $matchFound = false;
                    foreach ($form['field_age_range_tid']['#options'] as $optionId => $optionValue) {
                        if (strtolower($optionValue) == strtolower($a)) {
                            $form_state['input']['field_age_range_tid'] = $optionId;
                            $matchFound = true;
                            break;
                        }
                    }

                    if (!$matchFound) {
                        $form_state['input']['field_age_range_tid'] = 'All';
                    }

                    break;
                default:
                    break;
            }
        }

        //if trailing args are not specified, set the radio group to All
        if (count($args) < 1) {
            $form_state['input']['field_department_tid'] = 'All';
            $form_state['input']['field_age_range_tid'] = 'All';
        }
        else if (count($args) < 2) {
            $form_state['input']['field_age_range_tid'] = 'All';
        }

}
Note that during the process I insert the “All” term if a certain term is not found, then at the end of the function I append the “All” term if a URL comes in that doesn’t specify all of the search criteria. For example, if the URL is “toy-search-results/action-figures” we append “/all” to cover the age range requirement.
If you now select a link from the Shop Toys page, you will see the correct radio buttons automatically selected. This is because we reacted to the form_alter hook and modified the form state before it rendered.
You still can’t select further filters and click the Apply button and get the expected behavior, so we need to do something about that.
Modifying the Apply Button
The supplied Apply button does not act like we want, so we are going to add some code in our form_alter function to add our own button and behavior.
The first thing to note is that because we wanted exposed filters in the view, we were required to enable AJAX for the view. The default behavior for the Apply button is to send an AJAX request with the new filter. We do not want this to happen. We want to request the toy-search-results page again with the new search parameters instead. So first, we want to disable the default behavior of the form.
//set the form action to search-results page instead of the ajax views handler
$form['#action'] = 'toy-search-results';
//add our own filter button that calls a custom function to set
//up the appropriate search url
$form['buttons']['apply_filter'] = array(
'#type' => 'submit',
'#value' => 'Apply filter',
'#submit' => array(
'toysearch_apply_filter'
)
);
Notice the “#submit” index in the $form[‘buttons’][‘apply_filter’] array. This specifies a function that we want called when the user clicks our custom button. This is where we are going to redirect the default action to the URL we want.
In the following function we look at the radio buttons that have been selected and construct a URL consisting of “toy-search-results” plus the additional search terms based on the currently selected radio buttons. We then call Drupal’s goto function to redirect the user to the results page.
function toysearch_apply_filter(&$form, &$form_state) {
//get the filter value ids
$ids = array();
$ids['field_department_tid'] = $form_state['values']['field_department_tid'];
$ids['field_age_range_tid'] = $form_state['values']['field_age_range_tid'];
//get the actual filter values
$urlTerms = array();
foreach ($ids as $fieldName => $fieldId) {
foreach ($form[$fieldName]['#options'] as $optionId => $optionValue) {
if ($optionId == $fieldId) {
if ($optionId == 'All') {
$urlTerms[] = 'all';
}
else {
$term = $optionValue;
$term = str_replace(array(' '), '-', $term);
$urlTerms[] = $term;
}
break;
}
}
}
$urlString = implode('/', $urlTerms);
drupal_goto('toy-search-results/' . $urlString);
}
One problem remains. When that Apply Filter button is clicked, a query string is passed in to set the form state. All we need to do now though is test for the presence of a query string and parse the search arguments that way in addition to parsing a clean URL. Here is the entire form_alter function.
function toysearch_form_alter(&$form, &$form_state, $form_id) {
//make sure this is the toy search filter form
if (strpos($_SERVER['REQUEST_URI'], 'toy-search-results') != 1 ||
$form_id != 'views_exposed_form') {
return;
}
//set the form action to search-results page instead of the ajax views handler
$form['#action'] = 'toy-search-results';
    //hide the default filter button
    $form['submit']['#attributes'] = array(
        'style' => 'display:none;'
    );
    //add our own filter button that calls a custom function to set
    //up the appropriate search url
    $form['buttons']['apply_filter'] = array(
        '#type' => 'submit',
        '#value' => 'Apply filter',
        '#submit' => array(
            'toysearch_apply_filter'
        )
    );
//check if this page has a query string
//
//this would signify that the user has used the apply filter button
//on this filter instead of arriving at the search results directly, using
//a clean url
$queryString = $_SERVER['QUERY_STRING'];
if (!empty($queryString)) {
$args = explode('&', $queryString);
//select the appropriate filter value for each argument
foreach ($args as $a) {
$kvp = explode('=', $a);
switch ($kvp[0]) {
case 'field_department_tid':
$form_state['input']['field_department_tid'] = $kvp[1];
break;
case 'field_age_range_tid':
$form_state['input']['field_age_range_tid'] = $kvp[1];
break;
default:
break;
}
}
}
else {
//get the page arguments
$argStartPos = strpos($_SERVER['REQUEST_URI'], 'toy-search-results') + 19;
$argString = substr($_SERVER['REQUEST_URI'], $argStartPos);
$args = explode('/', $argString);
//select the appropriate filter value for each argument
$argCounter = 0;
foreach ($args as $a) {
//replace the hyphens with spaces so we can match the arg
$a = str_replace('-', ' ', $a);
switch ($argCounter++) {
//department
case 0:
$matchFound = false;
foreach ($form['field_department_tid']['#options'] as $optionId => $optionValue) {
if ($optionValue == $a) {
$form_state['input']['field_department_tid'] = $optionId;
$matchFound = true;
break;
}
}
if (!$matchFound) {
$form_state['input']['field_department_tid'] = 'All';
}
break;
//age range
case 1:
$matchFound = false;
foreach ($form['field_age_range_tid']['#options'] as $optionId => $optionValue) {
if (strtolower($optionValue) == strtolower($a)) {
$form_state['input']['field_age_range_tid'] = $optionId;
$matchFound = true;
break;
}
}
if (!$matchFound) {
$form_state['input']['field_age_range_tid'] = 'All';
}
break;
default:
break;
}
}
//if trailing args are not specified, set the radio group to All
if (count($args) < 1) {
$form_state['input']['field_department_tid'] = 'All';
$form_state['input']['field_age_range_tid'] = 'All';
}
else if (count($args) < 2) {
$form_state['input']['field_age_range_tid'] = 'All';
}
} //no query string
}
Conclusion
Everything is now functioning properly. The user can come to this page via the Shop Toys page which constructs a clean URL. The filter radio buttons are automatically set. The user can then add filters and the radio buttons will persist with the new choices and a new, clean URL will be constructed which can easily be shared.
I’ve got a couple of hacks in here and some hardcoded values (yuck) which I would ideally like to fix, but I welcome your feedback on any improvements I could make.
A recent project necessitated the use of a link shortener, which I had never used before, so I first turned to http:://goo.gl to see what was involved. I was pleasantly surprised with the ease of integrating Google’s API into my code. The following screenshots detail this simple process.
1. Get your API key from your Google API console
Get Your API Key
2. Turn on the link shortening service via the console
I am making an AJAX call from jQuery here, but the important part is that the response comes back as an array. If the “error” index is set, there was a problem. Otherwise, your shortened URL will be contained in the “id” index.
Starting a new, personal project in PHP, I wanted to try out a new framework for the fun of it. After doing a bit of review on many available frameworks, and ruling out the ones I have already used (Zend and OpenAvanti), I settled on CakePHP.
CakePHP
Installation and basic setup were a breeze, and I found the online documentation and tutorials helpful. Very early on, however, as I thought I was still trying to accomplish basic site setup tasks, I began to run into a few road blocks. Luckily, the API documentation is quite thorough and a pleasure to read, so I eventually got through the initial “new framework pains”. In this post, I will walk you through my basic setup and hopefully answer a few questions that may pop up for you after those initial inquiries into the docs.
Here is what I wanted to accomplish (This example isn’t meant to showcase fantastic architecture. It’s just to serve the purpose of making sure I knew how Cake was going to handle things. And believe me, it took several tries):
Have a public home page with a link to the admin panel
The admin panel requires user login
Simple, right? So let’s get started. Note that I’m using CakePHP 2.0.
The first thing we want to do is tell Cake that we intend to use the built-in Authorization Component. I chose to do that in the AppController, so that it is available to all controllers. Copy the default AppController file from the lib/Cake/Controller folder into the app/Controller folder. Within the class declaration, add the following code:
var $components = array('Auth', 'Session');
The $components variable takes an array of components, one of which we’ve specified as Auth.
Next we want the site to use our home controller as the default. Cake comes pre-built to use the pages controller, specified in the app/Config/routes.php file:
Now that we are setup to view home/index once we navigate to our site, let’s define the home controller in app/Controller/home_controller.php:
class HomeController extends AppController {
	var $uses = null;

	function beforeFilter() {
		$this->Auth->allow( 'index' );
	}

	function index() {
	}
}
Since the Auth component is in force for all controllers, we need to tell it to relax for the home/index action. We do this with the beforeFilter() function.
Also note the setting of $uses to null. Controllers usually have this set to the table they will be referencing. In this case, it makes no sense to have a “home” table in the database, so we must tell the controller that we are not going to be using a table.
Now we just need a view to show our admin panel link (located in app/View/home/index.ctp):
<p>This is the home/index view</p>
<p>
	<a href="/admin">Admin Panel</a>
</p>
If you navigate to your site, you should see the admin panel link.
Home Page
What we want to happen here is for a login screen to display if the anonymous user clicks the admin panel link. We’ve already told Cake that we are using Auth. Now we just have to do a couple of things to hook up a login screen and authenticate a user.
First, Auth is expecting a users controller (app/controller/users_controller.php):
class UsersController extends AppController {
	var $name = 'Users';

	function login() {
		if ($this->request->is('post')) {
			if ($this->Auth->login()) {
				return $this->redirect($this->Auth->redirect());
			}
			else {
				$this->Session->setFlash(__('Username or password is incorrect'), 'default', array(), 'auth');
			}
		}
	}

	function logout() {
		$this->redirect( $this->Auth->logout() );
	}
}
Note: To insert a password into your database that can use for login, use Cake’s built-in AuthComponent::password(‘your_password’) function to determine the hash.
Let’s setup the admin panel. Create the admin controller (app/Controller/admin_controller.php):
class AdminController extends AppController {
	var $uses = null;

	function index() {
	}
}
And the view (app/View/admin/index.ctp):
<p>This is the admin panel</p>
Now if you click the admin panel link on the home page, you should be greeted by a login screen.
Login Screen
After a successful login, you should then see the admin panel.
Admin Panel
So that is how I got a very basic setup running with CakePHP. Check out the great documentation at the official site if you run into trouble, and even start browsing the API. It’s good stuff.
I have been working on migrating a client from PayPal’s Website Payments Standard to Website Payments Pro, so they could begin handling purchases on their own website. PayPal and their corresponding developer network at http://www.x.com are loaded with documentation on how to use their APIs and test your code in the sandbox, before going live.
While this wealth of documentation is certainly welcome, their seems to be no clear path on which APIs you are to use in certain situations and how you are supposed to configure your code, depending on the PayPal plan you are currently under. As an example, I was referencing the wrong API documentation, well within my project, before I came across a forum post that said my code would not work unless I signed up for a more expensive plan that included access to that API.
Specifically, I was setting up my client to handle recurring payments using the Website Payments Pro plan. After a semmingly endless number of errors and wrong turns (no thanks to the confusing documentation), I finally received a successful response after transmitting a test transaction. With that, I would like to share here, the steps necessary to make this happen. I will not walk you through EVERY step, but point out the major steps and pitfalls that are not necessarily covered in the documentation.
4. Enter business information on the next page. Here are some key entries that you are unaware of unless you dig. Thanks to this document at https://www.x.com/docs/DOC-1603 for these tips
For the social security number, enter 111-NN-NNNN where N is a random number. Do not use all 1s
Select “Individual” for ownership type, “Arts, crafts, and collectibles” for business and “Antiques” for business subcategory
5. Select both fraud protection and recurring payments on the product selection page.
6. For the credit card information, you wall want to note the generated credit card number for later use. Select an expiration date in the future and 123 as the security code.
7. Confirm your email by checking your test account’s inbox (located on your developer.paypal.com page)
Sandbox email
8. In your test account, click the “Get Verified” link and setup your bank by entering a fake bank name. When asked to confirm by entering two deposit amounts, enter a random amount between .01 and .99.
Your test account is now setup. Here are two other items to note.
1. When you begin making calls to the PayPal API, you will need to pass in your API credentials. To get these credentials, login to your test account and click the Profile tab. Click the “Request API Credentials” link. Select Option 1 – PayPal API, Setup API credentials. Select View API Certificate. Your API username, password and signature will then be displayed.
2. The documentation gives you a bunch of test credit card numbers to use, such as 4111111111111111 for Visa. They don’t work. Instead, login to your developer account and click the “Credit Cards” link under your Profile. Add a new card and note the number, expiration date and security code.
Credit cards
I hope this helps some of you PayPal developers out there.
I recently finished a project for a client whose site was built on the DotNetNuke CMS. He wanted to integrate a blog into his site, so I was faced with three choices:
Find a suitable blog module for DotNetNuke
Write a DNN blog module from scratch
Find another blog platform and use it alongside the CMS
After failing to locate a blog module that I thought would satisfy the client, and not having the budget to write one from scratch, I was left with one choice. However, the next challenge presented itself. Since the visitor already has a login to the CMS site, it would be nice if they didn’t also have to login to the blog. This was going to require some custom coding, so the chosen blog platform had to expose a robust API. WordPress looked like it had all the answers. Now that I had the two platforms, the challenge was to get them to talk to each other.
The WordPress API includes functions for creating new users and logging them in. So the plan was to develop a WordPress plugin that would automatically check who the current CMS user was, register them with the blog if necessary, then log them in. WordPress would know who was logged in by checking a cookie stored by the CMS.
The following diagram illustrates the main components of the solution:
Blog and CMS
I would like to point out a couple items of interest with this solution:
Cookies are only able to be read by code within the same domain. Therefore, you would not be able to use this method if your CMS was at www.yourdomain.com and the blog was hosted at, say, WordPress.com.
Once the user clicks the blog link at the CMS, the cookie is stored for the blog’s use. If the user was visiting the site on a shared computer, you would not want another user to visit the blog and be automatically logged in as the previous user. Therefore, the cookie expires at the end of each user’s session.
If anyone else has had to tackle something similar to this, or have other ideas on how this could have been accomplished, I would love to hear from you.