WordPress is an excellent platform for anyone to use for their blog, and it’s even better for developers who wish to extend its functionality through the inherent plugin architecture. This article will guide you through the steps of creating your own plugin, enabling it to act as a widget and creating its own control panel to use through the administration interface.
We will be creating a simple plugin that displays a short bio of the blog author in the sidebar. This was actually a real-world scenario I was faced with when the blog design called for a bio in the sidebar. Two of the requirements were that the title (“author”) be represented by an image, and the author’s name be highlighted in bold. This situation called for custom markup to be generated instead of relying on the built-in WP sidebar functions.
So let’s get started.
The Foundation
The first thing to grasp is that a WordPress (WP) plugin, in its simplest form, is nothing more than a single PHP file residing in the wp-content/plugins folder. We will call our plugin mviAuthor.php.
A comment block needs to reside at the top of the file for WP to recognize information about your plugin.

The lines above are self-explanatory. WP uses this information in the admin panel as shown below.


The next step is to define a class that represents our plugin. Using a class is not necessary, but it keeps your code cleaner. If you are not familiar with using classes in PHP, refer to the documentation at php.net (http://www.php.net/manual/en/language.oop5.php). Let’s define our class.
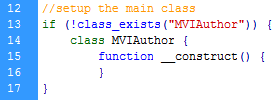
All we’ve done here is declare the class (line 14) if it doesn’t exist (line 13) and include a default constructor (line 15). We will need to display the author information, so let’s start simple and just display some static text.

Note that this function resides within the MVIAuthor class. We now have a function that can be called to actually output something to the screen. Let’s now set this up as a widget we can use.
Remember that this PHP file be run as long as we have activated the plugin. Therefore, the code in the file will be run every time a WP page loads. What we need to do then is to define a function to call when the plugins are loaded, register this plugin as a widget and define a function that will be called when the registration triggers. Let’s first react to the plugins getting loaded.

This statement is defined outside of any class or function, so it will run whenever WP loads the plugins. When they are loaded, a function named mviAuthor_init will called. Here is the definition for that function.

This function, also outside of the class, registers the plugin as a widget. The registration action calls a function named widget_MVIAuthor, and is defined below.

When this function is called, it makes sure the class has been defined (line 90), instantiates the class (line 91) and calls its displayAuthor function (line 92). If you go to the Widgets page in your WP admin panel, you will now see your widget in the Available Widgets panel.

If you drag the MVI Author widget over to the Sidebar panel, then look at your blog, you will see “This is the author text” displayed in the sidebar.
The Control Panel
Obviously we don’t want our widget to display “This is the author text”, but neither do we want to replace that text with something we want, directly in the PHP file either. If we did, we would have to require anyone using our widget to modify source code just to change their bio information. Luckily, WP lets you define a control panel for your widget, giving users an easy way to modify dynamic data.
Our first step is to register the function that will handle the control panel, so lets add a line to our mviAuthor_init function.

After registering the plugin as a widget, we then register the widget’s control panel by stating the function that will be called to handle the panel (line 107). Let’s now define that function.

Again, if the class exists (line 98), instantiate the class (line 99) and call a function to handle the control panel (line 100).
The function to handle the control panel resides within the MVIAuthor class. There is a lot going on within this function, so we will build it in little steps (Do not try to run the code in this function until you see it completely built. Otherwise WP will throw errors). The first step is to define how the control panel will look.
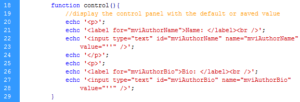
On the surface, we are simply displaying a small form, allowing the user to input the author’s name and a short bio.
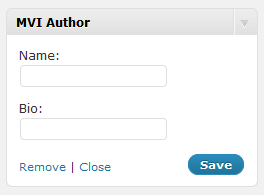
Now we need a way to save the data that you will input here. Just clicking the Save button at this point will do nothing. First, we need to determine if the user has clicked the Save button. To do that, we will add a hidden field to our form, then test to see if its value was posted.

Using Dynamic Data
We can now test if $_POST[‘bioSubmit’] and $_POST[‘nameSubmit’] exist, and if so, save them to the WP database. This is done with the built-in update_option function.

We’ll just check if $_POST[‘bioSubmit’] exists (line 33). If so, we will assign the post variables to local variables (lines 34 and 36) and save them to the database (lines 35 and 37). Now we can retrieve those names from the database, using the built-in get_option function,

make sure the values exist,

and display them on the form.

Note that the options are returned from WP as an array, so to display the author’s name we use the syntax $aName[‘mviAuthorName’]. We can now expand the displayAuthor function to display the values retrieved from the WP database.
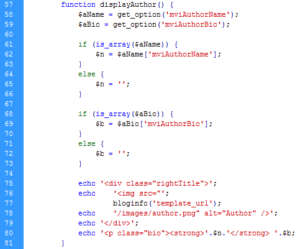
What I’ve done here is grab the values using the built-in get_option function (lines 58 and 59), checked to make sure they exist and if not, store nothing (lines 61 through 73), then display the data. I’ve added a couple of classes so I can target them with CSS (lines 75 and 80). I’ve also displayed the image as my widget title. Note here that I used the built-in bloginfo function and passed it the ‘template_url’ property to link to my image.
Summary
Here is an outline of the steps used to create the widget:
- Create a PHP file and place it in the wp-content/plugins folder
- Define a class that represents your widget
- Add two functions to the class: one to display output to the sidebar and one to handle the control panel
- Define two functions outside of the class that will be called upon widget and control panel registration
- Define a function outside of the class that calls the widget and control panel registration functions
- Add an action to the file that starts the whole process when the WP plugins are loaded
