Launching the Charity Tree Project

Charity Tree

Background

I developed a prototype web app for a charity organization a few years ago that was meant to give the administrators and volunteers control of their charity data through software, versus the traditional paper and pencil method. This project never took off, in part due to conflicting goals within the organization, lack of communication and most of all, my lack of experience at that time for maintaining a project capable of producing a reliable product and which could weather the storms of continual client change requests.

Times have changed, I have more experience, and I’ve been influenced by many great developers. I’ve been aching to take what I’ve learned and apply it to a product development project. I’ve decided that the charity project is a prime candidate for testing my new skills and ideas. The project started as a one-off, tailored-to-a-client application. I am changing the direction of the project to delivering a product that will work for many charity organizations dealing with the same types of issues.

What is a Charity Tree?

This project addresses “charity tree” programs run by charity organizations. These programs, usually run during the Christmas season, identify persons and families that are in need of help, then match them up anonymously with donors.

Many churches run internal programs of this type, where things like ornament tags are placed on a Christmas tree with ideas for gifts for a certain type of individual. A donor then takes a tag off the tree and will purchase a gift for the unknown individual. Behind the scenes, people are keeping track of who the recipients and donors are, which gifts have been delivered and a myriad of other details.

A charity organization will run the same type of program, except the number of applicants may be much larger and they may have other requirements as well, such as reporting some of their data to another organization. The people I worked with still did all of this pretty much by hand, which required an enormous amount of volunteer hours. The following tasks are an idea of what is involved in such a program:

  • Accept client and donor applications
  • Edit and follow up on applications
  • Match donors to clients based on several criteria
  • Track gifts outstanding, received and delivered
  • Send anonymous gifting cards to donors
  • Send reports to other organizations

The Product

The resulting product will be a web application that gives people within the organization easy control over the charity tree data. I envision an installable application (like WordPress) that will live on a web host.

Clients and donors will log in to fill out applications. Those without access to the web can turn in paper applications to the charity, at which time a volunteer could enter the application into the system.

Application users will have varying levels of access to the data including creating and editing of applications, matching clients to donors, tracking gifts, etc.

The goal of this software is to provide charities with an easy way to manage their program while being fun to use at the same time.

The Project

The guiding principles for the project are laid out in the fantastic book, Getting Real, by 37signals. My intentions are to follow their advice as close as I can. Two of the main objectives are:

  1. Keep the application simple
  2. Make the users happy

I will be posting progress on the project here and sharing my processes as I strive for these two goals.

Articles in this series:

Keys to Configuring the PayPal Sandbox for Recurring Payments

I have been working on migrating a client from PayPal’s Website Payments Standard to Website Payments Pro, so they could begin handling purchases on their own website. PayPal and their corresponding developer network at http://www.x.com are loaded with documentation on how to use their APIs and test your code in the sandbox, before going live.

While this wealth of documentation is certainly welcome, their seems to be no clear path on which APIs you are to use in certain situations and how you are supposed to configure your code, depending on the PayPal plan you are currently under. As an example, I was referencing the wrong API documentation, well within my project, before I came across a forum post that said my code would not work unless I signed up for a more expensive plan that included access to that API.

Specifically, I was setting up my client to handle recurring payments using the Website Payments Pro plan. After a semmingly endless number of errors and wrong turns (no thanks to the confusing documentation), I finally received a successful response after transmitting a test transaction. With that, I would like to share here, the steps necessary to make this happen. I will not walk you through EVERY step, but point out the major steps and pitfalls that are not necessarily covered in the documentation.

1. Login to your developer account at http://developer.paypal.com

2. Create a Website Payments Pro account

Create account
Create account

3. Click the “Sign Up” button on the next page

4. Enter business information on the next page. Here are some key entries that you are unaware of unless you dig. Thanks to this document at https://www.x.com/docs/DOC-1603 for these tips

  • For the social security number, enter 111-NN-NNNN where N is a random number. Do not use all 1s
  • Select “Individual” for ownership type, “Arts, crafts, and collectibles” for business and “Antiques” for business subcategory

5. Select both fraud protection and recurring payments on the product selection page.

6. For the credit card information, you wall want to note the generated credit card number for later use. Select an expiration date in the future and 123 as the security code.

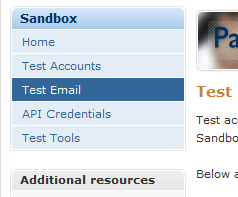
7. Confirm your email by checking your test account’s inbox (located on your developer.paypal.com page)

Sandbox email
Sandbox email

8. In your test account, click the “Get Verified” link and setup your bank by entering a fake bank name. When asked to confirm by entering two deposit amounts, enter a random amount between .01 and .99.

Your test account is now setup. Here are two other items to note.

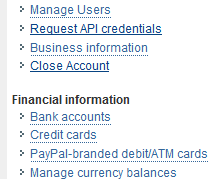
1. When you begin making calls to the PayPal API, you will need to pass in your API credentials. To get these credentials, login to your test account and click the Profile tab. Click the “Request API Credentials” link. Select Option 1 – PayPal API, Setup API credentials. Select View API Certificate. Your API username, password and signature will then be displayed.

2. The documentation gives you a bunch of test credit card numbers to use, such as 4111111111111111 for Visa. They don’t work. Instead, login to your developer account and click the “Credit Cards” link under your Profile. Add a new card and note the number, expiration date and security code.

Credit cards
Credit cards

I hope this helps some of you PayPal developers out there.

Version Control with TortoiseSVN

What is TortoiseSVN?

TortoiseSVN, a subversion client for Windows, is used for version control. It is open source and highly regarded in the programming community. You can use it for just about any kind of project, but the most popular is for controlling source code. You can find out more about it at http://tortoisesvn.tigris.org/.

Using TortoiseSVN is incredibly easy, but people first starting out may find  that the myriad of options can be overwhelming. TortoiseSVN does have a simple interface, but you will quickly realize that there are several methods available to carry out similar tasks. After piecing together bits of the official documentation and unofficial videos, I finally settled on a method that works for me.

Even more bewildering, especially if you are new to this process, is how to place an existing project under version control. I will specifically describe how I handle that, and will describe how I set up a repository and working folder to maintain my files on a daily basis.

Step One – Create the Repository

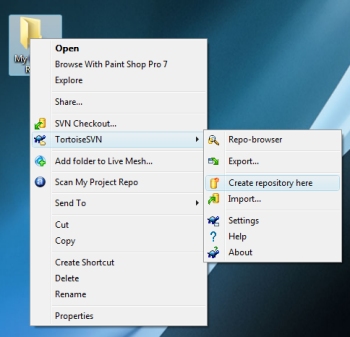
The repository is where your master files are kept — where files will be checked in and out of. Simply create a normal Windows folder, anywhere. We will call ours “My Project Repo”. Then right-click the folder for the context menu and select TortoiseSVN | Create repository here. You will then get a confirmation that the repository was successfully created. From now on, you will never treat this folder as a normal Windows folder.

Create repository
Create repository

Step Two – Import the files

Since we have an existing project, we will now import our project files into the repository. You will want to choose your highest level folder in your project hierarchy to import. We will be placing a Visual Studio project (called CampaignMonitorTest) under version control, so we will want to choose the folder in the main Visual Studio/Projects folder. (I realize that there is a VS plugin for TortoiseSVN, but I wanted to stay away from that for now).

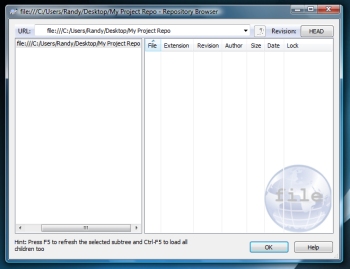
To import the project folder into the repository, open the repository browser by right-clicking the My Project Repo folder and selecting TortoiseSVN | Repo-browser. A window will display the contents of your repository. Right now it is empty.

Import files
Import files

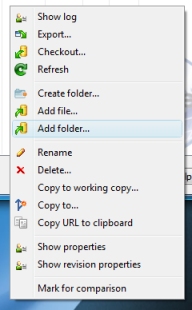
Right-click in the file area of the repo browser window and select TortoiseSVN | Add folder.

Add folder
Add folder

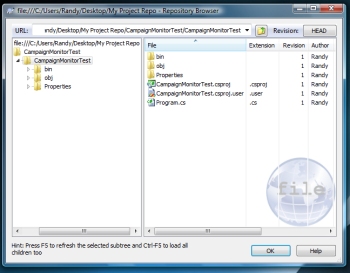
In the next window, navigate to your project folder and select OK. Enter a log message in the pop-up window, such as “initial import of project folder”. TortoiseSVN will then import your entire project. You can navigate your folder structure in the browser, just as you would in Windows explorer.

Imported files
Imported files

Step Three – Checkout a Working Copy

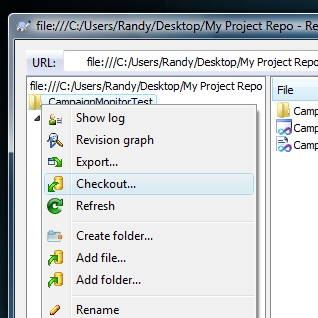
Your SVN folder is currently holding version 1 of your project, but your Visual Studio project folder has no connection with version control whatsoever. To remedy that, let’s first delete the Visual Studio project files from the project folder (this is the actual project folder in your Visual Studio hierarchy. If this seems scary at first, make a backup of your project files first). Now, checkout a working copy of your repository to the Visual Studio/Projects/CampaignMonitorTest folder by first right-clicking the top-level folder in the repo browser and selecting Checkout.

Checkout
Checkout

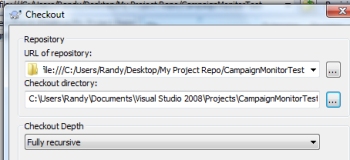
In the next window, navigate to your Visual Studio/Projects/CampaignMonitorTest folder for the Checkout directory.

Checkout from repository

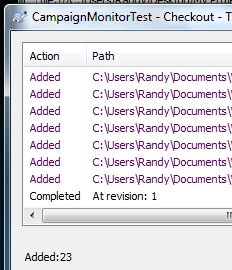
After clicking OK, TortoiseSVN will checkout a working copy of your project. You will see that you are currently at revision 1.

Checked out rev 1
Checked out rev 1

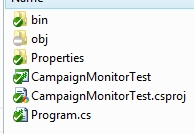
If you look at your working copy, inside the Visual Studio hierarchy, you will see your project folder with an icon overlay, indicating that your project is currently under version control, and is up-to-date.

Working copy up to date

Step Four – Ignore Unnecessary Files

There are a few things inside our project folder though that we don’t necessarily want versioned. For example, the files inside the obj folder are automatically created upon project compilation, so we don’t need to include those. In TortoiseSVN, we simply add that folder to the ignore list by right-clicking the folder and selecting TortoiseSVN | Delete and add to ignore list. You will then see a new icon overlay, indicating that the folder is marked for deletion (not from your file system, mind you, but from version control).

Marked for deletion
Marked for deletion

Step Five – Commit Files

Up in the Visual Studio/Projects folder, you will notice the CampaignMonitorTest folder is indicating that files within it have been modified and not yet committed back to the repository (this will normally be caused by your modifications to the code, but right now it is because we marked a folder for deletion).

Out of date
Out of date

Right-click the folder and select SVN Commit… Enter a log message and click OK. You will then see that your files are at revision 2.

Revision 2
Revision 2

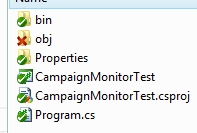
You will now notice in your Visual Studio/Projects folder that all of your versioned files display the overlay indicating that they are up-to-date. You will also notice that the obj folder has a new overlay, indicating that it is currently being ignored by version control, as you requested.

Up to date
Up to date

Creating a WordPress Widget

WordPress is an excellent platform for anyone to use for their blog, and it’s even better for developers who wish to extend its functionality through the inherent plugin architecture. This article will guide you through the steps of creating your own plugin, enabling it to act as a widget and creating its own control panel to use through the administration interface.

We will be creating a simple plugin that displays a short bio of the blog author in the sidebar. This was actually a real-world scenario I was faced with when the blog design called for a bio in the sidebar. Two of the requirements were  that the title (“author”) be represented by an image, and the author’s name be highlighted in bold. This situation called for custom markup to be generated instead of relying on the built-in WP sidebar functions.

So let’s get started.

The Foundation

The first thing to grasp is that a WordPress (WP) plugin, in its simplest form, is nothing more than a single PHP file residing in the wp-content/plugins folder. We will call our plugin mviAuthor.php.

A comment block needs to reside at the top of the file for WP to recognize information about your plugin.

Comment block
Comment block

The lines above are self-explanatory. WP uses this information in the admin panel as shown below.

Manage plugins
Manage plugins
Activate plugin
Activate plugin

The next step is to define a class that represents our plugin. Using a class is not necessary, but it keeps your code cleaner. If you are not familiar with using classes in PHP, refer to the documentation at php.net (http://www.php.net/manual/en/language.oop5.php). Let’s define our class.

Setup the main class

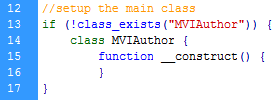
All we’ve done here is declare the class (line 14) if it doesn’t exist (line 13) and include a default constructor (line 15).  We will need to display the author information, so let’s start simple and just display some static text.

Display author
Display author

Note that this function resides within the MVIAuthor class. We now have a function that can be called to actually output something to the screen. Let’s now set this up as a widget we can use.

Remember that this PHP file be run as long as we have activated the plugin. Therefore, the code in the file will be run every time a WP page loads. What we need to do then is to define a function to call when the plugins are loaded, register this plugin as a widget and define a function that will be called when the registration triggers. Let’s first react to the plugins getting loaded.

Add action
Add action

This statement is defined outside of any class or function, so it will run whenever WP loads the plugins. When they are loaded, a function named mviAuthor_init will called. Here is the definition for that function.

Author Init
Author Init

This function, also outside of the class, registers the plugin as a widget. The registration action calls a function named widget_MVIAuthor, and is defined below.

Plugin loaded
Plugin loaded

When this function is called, it makes sure the class has been defined (line 90), instantiates the class (line 91) and calls its displayAuthor function (line 92). If you go to the Widgets page in your WP admin panel, you will now see your widget in the Available Widgets panel.

Available widgets panel

If you drag the MVI Author widget over to the Sidebar panel, then look at your blog, you will see “This is the author text” displayed in the sidebar.

The Control Panel

Obviously we don’t want our widget to display “This is the author text”, but neither do we want to replace that text with something we want, directly in the PHP file either. If we did, we would have to require anyone using our widget to modify source code just to change their bio information. Luckily, WP lets you define a control panel for your widget, giving users an easy way to modify dynamic data.

Our first step is to register the function that will handle the control panel, so lets add a line to our mviAuthor_init function.

Register widget and panel

After registering the plugin as a widget, we then register the widget’s control panel by stating the function that will be called to handle the panel (line 107). Let’s now define that function.

Control panel function

Again, if the class exists (line 98), instantiate the class (line 99) and call a function to handle the control panel (line 100).

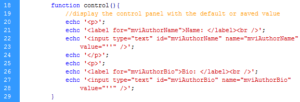
The function to handle the control panel resides within the MVIAuthor class. There is a lot going on within this function, so we will build it in little steps (Do not try to run the code in this function until you see it completely built. Otherwise WP will throw errors). The first step is to define how the control panel will look.

Control function
Control function

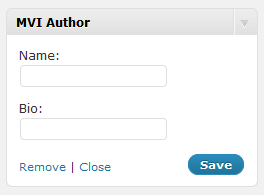
On the surface, we are simply displaying a small form, allowing the user to input the author’s name and a short bio.

Widget settings
Widget settings

Now we need a way to save the data that you will input here. Just clicking the Save button at this point will do nothing. First, we need to determine if the user has clicked the Save button. To do that, we will add a hidden field to our form, then test to see if its value was posted.

Hidden input
Hidden input

Using Dynamic Data

We can now test if $_POST[‘bioSubmit’] and $_POST[‘nameSubmit’] exist, and if so, save them to the WP database. This is done with the built-in update_option function.

Save setting to database

We’ll just check if $_POST[‘bioSubmit’] exists (line 33). If so, we will assign the post variables to local variables (lines 34 and 36) and save them to the database (lines 35 and 37). Now we can retrieve those names from the database, using the built-in get_option function,

Retrieve settings
Retrieve settings

make sure the values exist,

Set default
Set default

and display them on the form.

Display settings
Display settings

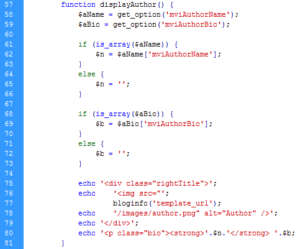
Note that the options are returned from WP as an array, so to display the author’s name we use the syntax $aName[‘mviAuthorName’]. We can now expand the displayAuthor function to display the values retrieved from the WP database.

Display author
Display author

What I’ve done here is grab the values using the built-in get_option function (lines 58 and 59), checked to make sure they exist and if not, store nothing (lines 61 through 73), then display the data. I’ve added a couple of classes so I can target them with CSS (lines 75 and 80). I’ve also displayed the image as my widget title. Note here that I used the built-in bloginfo function and passed it the ‘template_url’ property to link to my image.

Summary

Here is an outline of the steps used to create the widget:

  1. Create a PHP file and place it in the wp-content/plugins folder
  2. Define a class that represents your widget
  3. Add two functions to the class: one to display output to the sidebar and one to handle the control panel
  4. Define two functions outside of the class that will be called upon widget and control panel registration
  5. Define a function outside of the class that calls the widget and control panel registration functions
  6. Add an action to the file that starts the whole process when the WP plugins are loaded


Adding jQuery to a Custom DotNetNuke Module

Step 1: Register jQuery

In the code behind for the page you will be making jQuery calls, register the library in the OnPreRender event:

protected override void OnPreRender(EventArgs e)
{
string moduleDir = this.TemplateSourceDirectory;
Page.ClientScript.RegisterClientScriptInclude("jQueryScripts", moduleDir + "/scripts/jquery-1.3.2.js");
Page.ClientScript.RegisterClientScriptInclude("jsUtilities", moduleDir + "/scripts/utilities.js");
}

The first line stores the path to the module’s folder. I stored the jQuery library in the module’s scripts folder, so the next line registers the library with a supplied key (your choice of name) and the path to the library.

The third line registers another javascript library, this time one of my own javascript files.

Step 2: Initialize jQuery

DNN has name conflict issues with jQuery so the following line is needed (thanks to Steve Johnson at Abstract Coder for this tidbit):

var $j = jQuery.noConflict();

I included this in my utilities.js file outside of any functions.

Step 3: Call jQuery Functions

It is important to note that all of your calls to jQuery functions will use this $j variable instead of the normal, single $ you will find documented just about everywhere.  So for example, the document ready function will look like this:

$j(document).ready(function() {
//your code here
});

Now you can write your normal javascript code and call jQuery functions throughout. Just remember to use the $j variable.

Step 4: Accessing Control IDs

This step is not specific to jQuery, but I wanted to include it because I found that many people, including myself, were having a hard time trying to figure out how to target controls with javascript. Consider the following ASP.NET control on a page:

<asp:textbox id="simpleTextBox" runat="server" />

When using this control server-side, say with C#.NET, you write things like:

string t = simpleTextBox.Text;

So, naturally, you’d think to access this control via javascript, you would write something like:

t = document.getElementById("simpleTextBox")

However, ASP.NET will prefix all of your controls with parent container IDs to avoid conflicts. Thus your ID of simpleTextBox will be converted to something like dnn_ctr459_EditMyModule_simpleTextbox. This doesn’t matter to your code as it stays server-side, but once it hits the client, your javascript code has no clue what simpleTextBox is anymore.

My solution is to specifically tell javascript what the new name of the control is (my thanks to steveradich’s post at aspdeveloper.net for nudging me in the right direction here).

1. Register the javascript event handler when the page loads

protected void Page_Load(object sender, EventArgs e)
{
simpleTextBox.Attributes.Add("onclick", "testFunction('" + simpleTextBox.ClientID + "')");
}

The key to this line of code is the ClientID property. We are sending our javascript code the new name of the control here.

2. Access the control from javascript

testFunction(cid) {
c = document.getElementById(cid);
}

Note here that we are using the same getElementById function, but now we are armed with the new ID of the control.

3. Target the control with jQuery

The following is an example of targeting the control using jQuery syntax:

$j('#' + cid).slideDown('normal');

*Note: I used this solution with my current installation of DNN, which
is 4.9. Version 5.0 has native jQuery support, which may change some of
these steps.

Integrating a Third-Party Search Service Into Magento

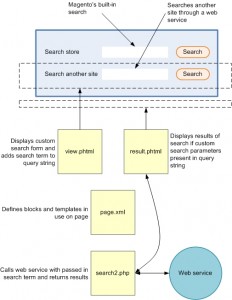
I’ve just finished integrating a custom search module into Magento and thought I’d share how I decided to lay out the main components. Again, I’m still feeling out how all of the different pieces of the Magento puzzle fit together, so I’m sure there are better ways of doing this. However, refer to the diagram below, and I will detail my implementation.

Magento search module integration
Module integration

I have a search container that actually holds two different search types. The first search type is the built-in Magento store search. I did not change any functionality for this module, so I simply modified the stylesheets to have it fit into my theme. The second search type, however, allows the user to search a third-party service, and display the results inline with the current store. You don’t have to think of a specific web service, just a generic one which receives a search term and returns results.

As with all Magento modules, the new module must be registered with the framework (see earlier post). After that is done, the module must be displayed. I wrote a view.phtml page to display the custom search form. There is nothing too interesting about this file, just note that it contains its own form with its own action attribute. However, in this example, this behavior is identical to the built-in search form, which is to post back to the current page. In this case, it will add the search term to the page’s query string.

To display the results, note that the result.phtml file is always rendering HTML. There’s just nothing to render unless there is a search term present in the page’s query string (provided by clicking the custom search button). If a search term is present, result.phtml sends its parent object (search2.php, as defined in page.xml) the search term. Search2.php then calls the web service, receives the results then sends them back to result.phtml for rendering to the page.

Integrating a Blog with an Existing CMS

I recently finished a project for a client whose site was built on the DotNetNuke CMS. He wanted to integrate a blog into his site, so I was faced with three choices:
  1. Find a suitable blog module for DotNetNuke
  2. Write a DNN blog module from scratch
  3. Find another blog platform and use it alongside the CMS

After failing to locate a blog module that I thought would satisfy the client, and not having the budget to write one from scratch, I was left with one choice. However, the next challenge presented itself. Since the visitor already has a login to the CMS site, it would be nice if they didn’t also have to login to the blog. This was going to require some custom coding, so the chosen blog platform had to expose a robust API. WordPress looked like it had all the answers. Now that I had the two platforms, the challenge was to get them to talk to each other.

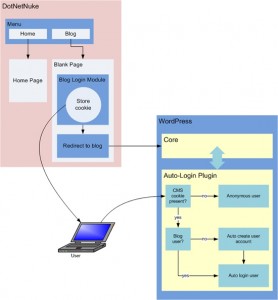
The WordPress API includes functions for creating new users and logging them in. So the plan was to develop a WordPress plugin that would automatically check who the current CMS user was, register them with the blog if necessary, then log them in. WordPress would know who was logged in by checking a cookie stored by the CMS.

The following diagram illustrates the main components of the solution:

Blog and CMS
Blog and CMS

I would like to point out a couple items of interest with this solution:

  1. Cookies are only able to be read by code within the same domain. Therefore, you would not be able to use this method if your CMS was at www.yourdomain.com and the blog was hosted at, say, WordPress.com.
  2. Once the user clicks the blog link at the CMS, the cookie is stored for the blog’s use. If the user was visiting the site on a shared computer, you would not want another user to visit the blog and be automatically logged in as the previous user. Therefore, the cookie expires at the end of each user’s session.

If anyone else has had to tackle something similar to this, or have other ideas on how this could have been accomplished, I would love to hear from you.

Magento Architecture for a Simple Module

Preparing to write my first custom Magento module, I dove into the documentation that was available, as well as various blog posts, and slowly started to understand some of the pieces. The whole picture was eluding me, however, so I began to diagram how everything fit together. I referred to the following pages when creating the diagrams:
http://activecodeline.com/writing-a-custom-module-in-magento-detailed-walktrough/

http://www.exploremagento.com/magento/simple-custom-module.php

http://stackoverflow.com/questions/576908/how-does-magento-code-work

Please note two cautionary items before reading further. 1) I am new to the Magento framework, so the following explanations are based on my limited knowledge of this subject. 2) These diagrams detail an extremely simple custom module that does not take advantage of many advanced features, including layouts and controllers. I am hoping though that they may shed some light for some of you. I am currently working through some of those advanced features, however, and hope to post an article when I am comfortable with them as well.

I will dissect the module here, but you may view the whole thing at once at the bottom of this post.

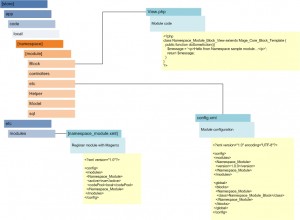
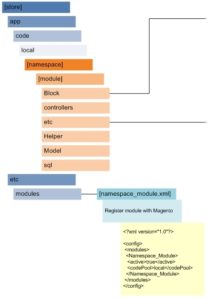
For the new module to be registered and seen by Magento, an XML file needs to be created in the following path: [store]/app/etc/modules/, where [store] is your store’s root directory. The XML file needs to be named with the following convention: [namespace_module].xml, where namespace is your code’s namespace (defined by you, usually your company name) and module is your module’s name.
Magento Module Registration
Magento module registration

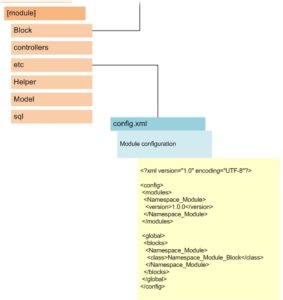
Your actual module resides in the following path: [store]/app/code/local/[namespace]/[module] and its several subfolders. You will create a configuration file in the etc folder called config.xml.

Configure the Magento Module
Configure the Magento module

Now the module needs to do something when it is called by a template, so we will create a code file called View.php and place it in the module’s Block folder.

Configuring the View
Configuring the view

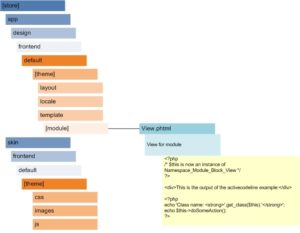
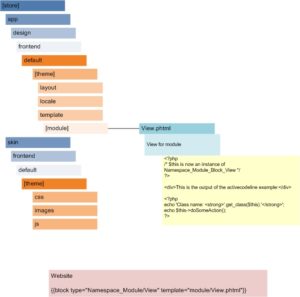
We will now move over to the theme, or skin, to see how to make use of this module on an actual store page. Your theme contains a template folder which holds folders for your modules. We will create a View.phtml file that outputs direct HTML and calls a function for more HTML in its model, or block, at View.php.

Output of the view
Output of the view

The only thing left is to actually instantiate the module on a store page. This will most likely be done as an integrated part of your theme, but for now we will keep it simple. Enter the CMS portion of your store and open up a page of your choice. Enter the following line somewhere in the body:

{{block type=”Namespace_Module/View” template=”module/View.phtml”}}

substituting namespace and module for your actual names.

What has happened here is that you’ve instantiated your module’s view (View.php) using the template (View.phtml). View.phtml now outputs HTML and calls its underlying model to provide more functionality.

I hope this makes sense for you and comes in as a handy supplement to the aforementioned links, as I am only beginning to grasp it. Feel free to comment and set me straight if I’m off in left field on any of this.

Here are the diagrams in full:

Magento module architecture
module architecture
Magento module skin architecture
Skin architecture

PayPal, ASP.NET and PDT

I am working on a client’s site, which requires subcribing to a newsletter via PayPal. Other requirements include:

  • The site lives within the DotNetNuke content management system
  • A custom DNN module must be written with C# and ASP.NET to handle post-processing of the transaction data

After reading through the documentation at PayPal’s developer site, I thought I had a handle on how to write the code. I was wrong, and thankfully several forums and a handy tool later, the code appeared to be working (although I was consitently getting a FAIL response from PayPal’s PDT interface). After scouring the docs and forums again for a solution to the FAIL problem, I finally realized that maybe the reason for the FAIL was that the payment was not going through.

I’m testing this process within PayPal’s sandbox, so I went into the settings to find out if I had set something wrong. And of course I did. I had previously set up a few accounts manually, obviously not quite understanding how to get everything setup properly. The email addresses were not verified, for one thing. Luckily, PayPal has an option to setup preconfigured buyer and seller accounts.

PayPal Sandbox
PayPal Sandbox

After I setup a couple of preconfigured accounts, everything worked beautifully. I’ve never seen this mentioned in any of the forums, so hopefully, this will be what some of you are looking for.

Lessons in JavaScript and AJAX

I’ve recently added AJAX capability to the flightphys site, which was my first foray into the world of AJAX. I also took advantage of the excellent Shadowbox library. I’ve walked away with a few lessons:

  1. Making simple AJAX calls is really simple once you’ve gone through a few tutorials. I initially tried to use a few different libraries and couldn’t quite get things to work the way I wanted to. So I buckled down and learned some raw AJAX. A good tutorial is at w3schools. After letting the material sink in, I was able to process a form by running some server-side PHP and returning HTML through an AJAX call.
  2. Shadowbox does not like to be auto-initialized when using AJAX. Usually, you set up Shadowbox in your page’s <head> section and wait for the page’s elements to make the calls. However, if you’re making AJAX calls, you may not want Shadowbox to run until you’ve loaded the correct elements. To accomplish this, modify the skipSetup property in shadowbox.js from false to true. Then, after your AJAX call, add calls to Shadowbox.setup() and Shadowbox.init().
  3. If you are calling AJAX from a form, chances are you do not want to actually submit the form. So you add an onClick() event to the form’s button (which, by the way, is now just a type=”button” and not a type=”submit”) and everything is fine right? Almost. If the user presses the Enter key, the form will still try and submit. To prevent this behavior, you’ll want to add an onkeydown() handler to your form. In the handler, check if the Enter key was pressed, and handle it there.

These were just quick overviews of the solutions. If you’d like more detail, please let me know.